Checkout counter assortment
A compact tray can keep a small product range visible near a point of service while the low front edge leaves the individual items accessible.

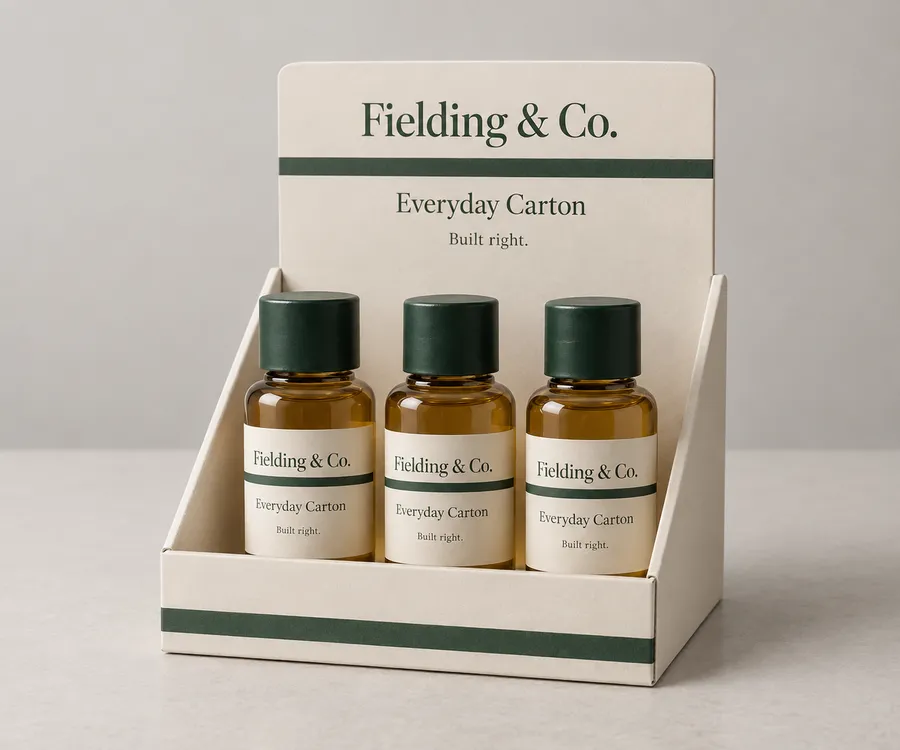
Open cardboard counter display tray with three amber bottles and printed raised back panel
Cardboard Boxes
Custom cardboard counter display boxes put a compact product assortment at the point of sale with a low front lip, stable base, and visible back panel. Plan the footprint around the packed products, choose the facing arrangement, then review board, print coverage, finishes, and any folded support before the dieline is finalized.
Last updated
Working quote
Product brief
Cardboard counter display boxes are designed for a defined point-of-sale space, where the product row and the printed back panel need to work together. Start with the counter, not a generic box shape. A small display may need a short front lip for easy access, a raised back panel for the brand message, or a compact base that stays within the available service area. The right arrangement depends on the packed product dimensions, the number of visible facings, the way items are loaded, and the message that must remain visible after the display is filled.
Describe the setting in the brief: where the display sits, which direction customers approach from, how many products should be visible, and whether the unit is replenished from the front or from above. Those details determine the practical footprint and the position of the printed surfaces. An open-front tray, a stepped interior, and a taller back panel each present the product differently. The display structure should be selected around the product and counter use rather than treated as a decorative sleeve.
Measure each packed product in the orientation it will occupy. Record the assembled height, width, and depth, including a closure, cap, tab, or other projection that changes the profile. Then provide the number of products per row, the number of rows or tiers, the desired front-facing count, and the loaded weight. If the display holds several product variants, identify each size and show which one should lead the arrangement. A photograph or physical sample helps when the product has shoulders, an uneven base, or a label that needs to face a particular direction.
The available counter space matters just as much as the individual product. Share the maximum footprint, height restriction, preferred loading direction, and the clearance needed for a hand to remove an item. Product geometry drives the interior arrangement, which drives the outer dimensions and the base construction. A different count, tier arrangement, or product orientation can require its own dieline even when the display has the same general style. Final allowances are confirmed during the specification and dieline review instead of being borrowed from an arbitrary clearance rule.
The structure should keep the product visible and give the printed panel a clear job. A low open-front tray can make individual items easy to pick up. A deeper cavity can organize products that need more lateral support. A raised back panel can carry the brand name or product message above the row without covering the items. These are different structural decisions, and the best combination depends on the packed product, the counter footprint, the number of facings, the loading motion, and the way the display will be replenished.
Corrugated Board can suit a display that needs a more substantial fluted base presence, while SBS Paperboard offers a smooth surface for a folding retail format. Kraft Paperboard can support a more natural printed direction. Internal support may be integrated into the folded structure or supplied as a separate paperboard element, depending on product geometry, weight, fragility, orientation, loading method, and the desired reveal. Those variables should be reviewed together rather than reduced to a single insert rule.
Place the main message on the surface a customer can see while standing at the counter. Depending on the format, that may be the raised back panel, the front lip, the side walls, or a visible inside surface. The product name and brand mark should follow the display orientation, while any supporting information should remain legible after the tray is loaded. A proof review can reveal when a fold, ledge, or product row hides part of the artwork.
Foil stamping can highlight selected lettering or linework when the artwork and board are suitable for the treatment. Matte lamination can provide a lower-glare surface, while gloss lamination can create a brighter surface appearance. These finish directions should be considered with the fold lines, cut edges, handling, and counter lighting in mind. A free dieline and proof review is included on every order at no extra charge, so the structure and artwork can be checked together before production.
A useful quote request includes the packed product dimensions, product count per row, number of facings, maximum counter footprint, display height, loading direction, loaded weight, preferred board, print coverage, finish direction, and any internal support requirement. If artwork already exists, identify the surfaces that carry the main message. If the structure is still open, send product photographs or a physical sample so the tray, back panel, and loading route can be discussed before the dieline is prepared.
The standard minimum order is 50 units. Production is from 7 business days after digital proof approval, and Free US shipping is available on the standard fulfillment path. A sample kit carries a $44.99 shipping charge credited toward the first order when you need to review board feel or printed finish in hand. Quotes are typically answered the same business day and always within 24 hours. The quotation then turns the product information into a reviewed display footprint, support approach, artwork layout, and production-ready specification.
Cardboard counter display boxes are easiest to scope when the counter environment is treated as part of the product brief. Tell us what the shopper should see first, how many units should face forward, how the display will be loaded, and which panel carries the brand message. Those inputs give the structural and visual review a clear starting point.
Proof points
A counter display needs its physical access and printed presentation to agree. These are the decisions to confirm before the structure moves into production.
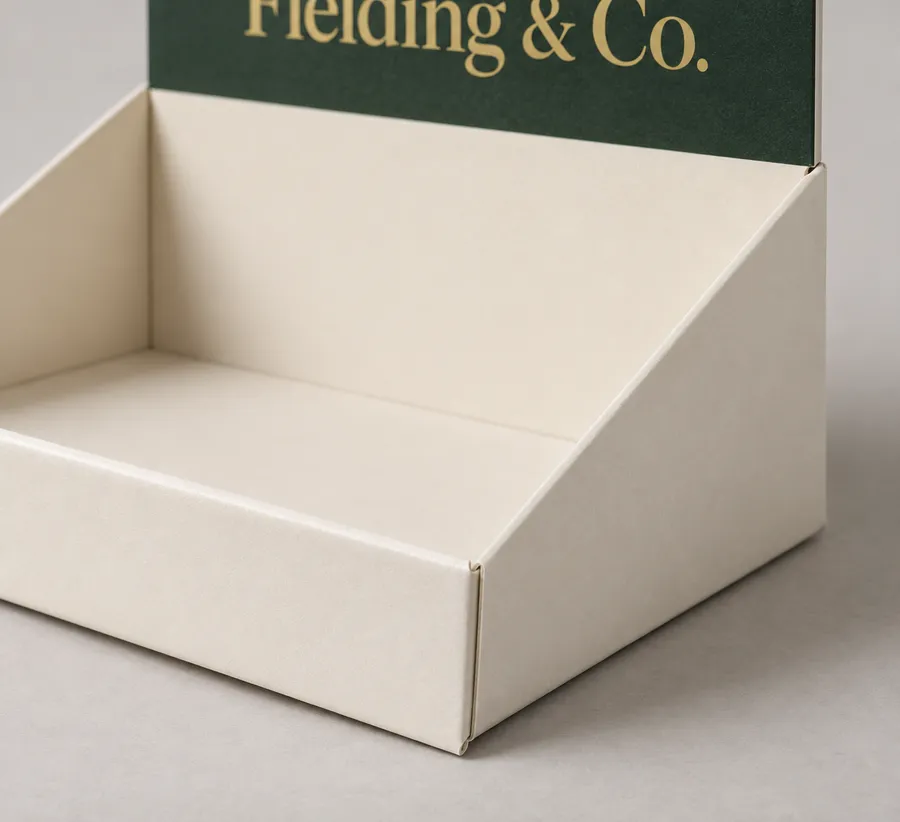
Cardboard counter display boxes combine a product tray with the visible panel that frames the retail message. The low front edge, base footprint, back-panel height, product count, and loading direction are considered together so the finished unit can present the assortment without losing the practical access the counter setting requires.
A compact tray can keep a small product range visible near a point of service while the low front edge leaves the individual items accessible.
A raised back panel can carry the product name and brand message while several small bottles or cartons face forward in one organized row.
A printed display can frame a limited assortment when the counter footprint, replenishment route, and message hierarchy are known before the dieline is prepared.
A shallow open-front structure can keep smaller units grouped and visible when shoppers need to select one item without lifting the whole display.
The back panel, front lip, side walls, and any visible interior can carry the brand name, product message, and directional information. Choose the treatment with the folds, cut edges, loading method, and counter lighting in mind.
The display review connects the packed product to the counter space before artwork is finalized. It looks at the footprint, front access, product facings, back-panel visibility, and the folded or separate support needed for the intended presentation.
Share the available width, depth, height, approach direction, and replenishment route so the base and back panel fit the point-of-sale setting.
Provide product count, row or tier plan, orientation, and loaded weight so the visible product line and internal support can be reviewed together.
Identify which panel should carry the brand name, product message, or directional information after the display is loaded.
The quote process is clearer when the counter setting and product arrangement are described together. The review then moves from packed-product information to a proof before production.
Send packed dimensions, product count, facings, orientation, loaded weight, available footprint, display height, and photographs or samples that clarify the product.
Identify the front access, loading direction, replenishment route, preferred front lip or back panel, and any folded or separate support to consider.
Share artwork status and any preference for Corrugated Board, SBS Paperboard, Kraft Paperboard, Foil Stamping, Matte Lamination, or Gloss Lamination.
Confirm the display footprint, product-facing arrangement, panel orientation, and artwork placement before the digital proof is approved for production.
Need help with structure, materials, or production planning? See how we manufacture custom packaging.
Request a sample kit to compare paperboard and corrugated surfaces, print treatment, and the way a counter display presents a packed product. The $44.99 shipping charge is credited toward your first order.
Shipping charge: $44.99. Credited toward your first order.
Request a Sample KitFind clear answers about fit, materials, and ordering below.
Share the packed product dimensions, product count, facings, orientation, loaded weight, counter footprint, display height, loading direction, preferred board, print coverage, finish direction, and any internal support requirement. Photos or a physical sample can help explain an unusual shape.
It can be planned for several product variants when the sizes, count, orientation, and facing arrangement are provided together. Each materially different arrangement may need its own dieline even when the displays share the same general style.
The category options include Corrugated Board, SBS Paperboard, and Kraft Paperboard. The suitable direction depends on the display footprint, packed products, support geometry, desired printed surface, and the way the unit will be handled.
Foil Stamping, Matte Lamination, and Gloss Lamination are available finish directions for the category. The chosen treatment remains subject to artwork review, especially where it meets folds, cut edges, small lettering, or the front lip.
Production is from 7 business days after digital proof approval on the standard path. Orders start at 50 units, and free US shipping is available on the standard fulfillment path.
Orders start at 50 units and scale up to 500,000 for bulk runs, with pricing from $0.19 per unit on larger quantities. Standard production is from 7 business days after digital proof approval.
Custom cardboard counter display boxes put a compact product assortment at the point of sale with a low front lip, stable base, and visible back panel. Each order is made to order around your packed product and artwork, and the specification is confirmed against a digital proof before production.
Compare nearby products and request the format that best fits your next run.
Available product
Available product
Available product
Available product
Plan the point-of-sale display
Send the packed product details, counter footprint, facing plan, artwork status, and any board or finish preference. Easy Box Packaging can then review the tray, back panel, support, and printed surfaces as one quote-ready specification.
Add your product details to see a quote summary.