
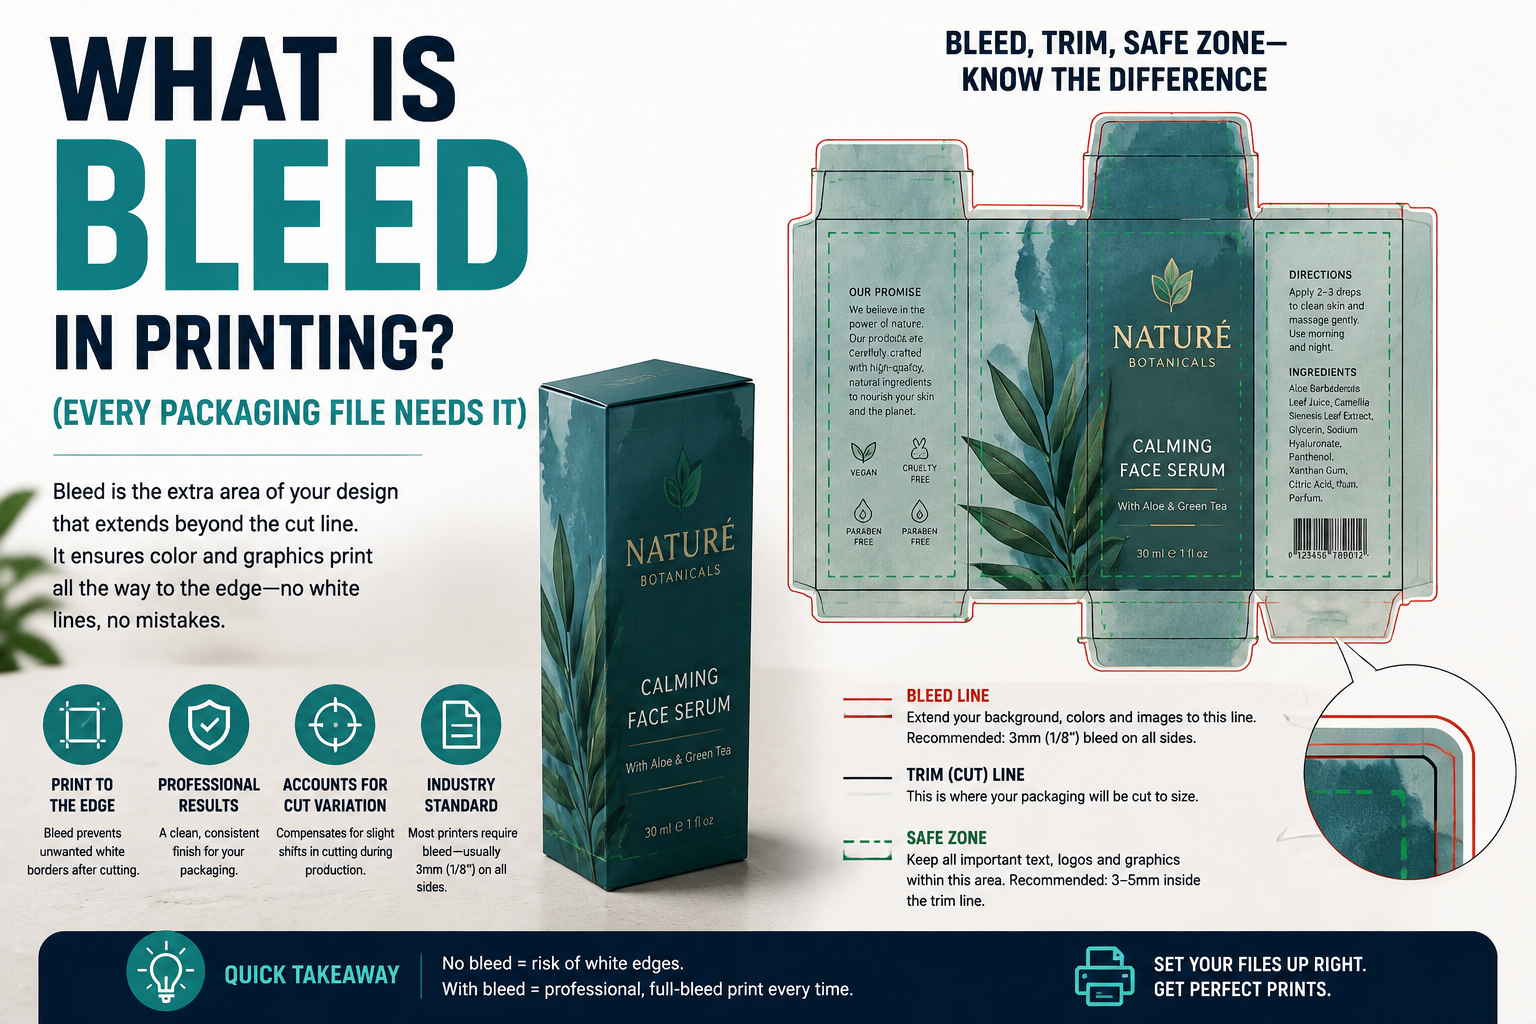
What is bleed in printing? It’s extra artwork that extends past the edge of your design. You add it so a small cutting shift doesn’t leave a white gap on the finished box. The standard amount is 1/8 inch, or about 3mm, on every edge that gets trimmed. Skip it, and a tiny cut drift can show up as a visible flaw on your finished box.
This article covers what is bleed in printing, in plain terms. It covers why packaging needs it more than flat print, and how to set it up right.
Why Packaging Always Needs Bleed
Cutting equipment isn’t perfectly precise. Even a well-calibrated machine has a small tolerance. That’s often just a fraction of a millimeter, sometimes a bit more. It happens on almost every print run.
Bleed exists to absorb that shift. Say your artwork stops exactly at the edge of your file. Any cut drift then exposes a sliver of raw, uncolored board. Extend your artwork past the edge instead. That same drift just trims off extra color that was never meant to be seen.
Packaging is less forgiving than flat print here. A box panel edge often lines up with a fold or a die-cut line. It’s not a straight guillotine trim. A bleed miss on a flat postcard shows a thin white sliver. The same miss on a box can leave a visible gap right where two panels meet. That stands out far more on a folded box than on a flat sheet.
What Is Bleed in Printing: Standard Dimensions
The standard bleed allowance in US commercial print is 1/8 inch, or 3mm, on each trimmed edge. This covers most simple box shapes with no special adjustment.
Complex die-cut shapes sometimes need more. A box with tight curves or sharp corners can call for a custom bleed amount from your supplier. Always confirm the exact bleed requirement for your specific dieline. Don’t assume the standard 1/8 inch covers every shape.
Bleed vs. Safe Zone vs. Trim Line
Three lines matter on every print file. They’re easy to mix up. The trim line marks exactly where the cut happens. That’s the actual edge of your finished box panel.
The safe zone sits inside the trim line, usually 1/8 inch in from it. Keep important text and logos inside this zone. Get too close to the trim line, and a slight drift can cut off part of your text.
The bleed extends past the trim line, in the opposite direction from the safe zone. Bleed is the buffer that gets trimmed away. Safe zone is the buffer that never should be. Together, these three lines guard your design against normal cutting drift in both directions.
The Fold-Line Problem Most Guides Skip
Here’s what most bleed guides never mention. A bleed miss on a flat sheet is just a cosmetic flaw. A bleed miss on packaging can be worse than that. So many box edges sit right on a fold.
I’ve seen a brand submit box art with no bleed margin at all. They assumed the trim would land exactly on the file’s edge every time. The die-cut trim shifted slightly, the way it commonly does on any real run. The finished boxes had a visible white gap right at a fold line. Two colored panels were meant to meet there cleanly. The gap sat on a visible fold. It stood out far more than the same miss would on a flat sheet. The reprint used a proper bleed margin, and the panels lined up right.
What is bleed in printing actually worth to a brand owner? It’s the gap between a clean finished box and a visible flaw that never should have shipped.
How to Set Up Bleed in Common Design Tools
In Adobe Illustrator, set your bleed value in the New Document dialog. You can also adjust it later under File, then Document Setup. Extend your background art past the artboard edge by that amount. Adobe’s own bleed guide covers the setup steps in more detail.
Photoshop handles bleed in a similar way. It’s less common for packaging files, though, since it works with pixels rather than scalable paths.
In Canva, look for a bleed toggle in the print settings before you download your file. Not every template includes one by default, so check before you export.
Once you know what is bleed in printing supposed to do, this checklist confirms your file is ready.
Bleed Checklist Before You Submit Artwork
- Extend all background colors and images 1/8 inch (3mm) past the trim line, on every edge.
- Keep all text and logos inside the safe zone, at least 1/8 inch inside the trim line.
- Confirm your dieline file shows the trim line, safe zone, and bleed clearly, not just the trim line alone.
- Ask your supplier whether your box shape needs a custom bleed amount beyond the 1/8 inch standard.
- Flatten your file with bleed already built in. Don’t assume your printer will add it for you.
Common Mistakes
The first mistake is stopping artwork exactly at the trim line. This leaves zero buffer for cutting drift, which happens on every print run.
The second mistake is placing text or a logo too close to the trim line. Even inside the safe zone, get too close and a slight drift can clip a key detail.
The third mistake is assuming bleed only matters for large print runs. Even short-run digital printing has cutting tolerance. Bleed matters at any run size.
A fourth mistake is mixing up bleed and safe zone. They guard against the same drift from opposite sides of the trim line. Confusing them in your file can cause the wrong kind of clipping.
A fifth mistake is sending a flat proof and assuming it shows the folded result. Our guide to print proofs covers why a physical, folded sample catches issues a flat file never will.
FAQ
What is bleed in printing, exactly? It’s extra artwork that extends past your design’s trim line. It gives the cutting process room for normal drift, so small shifts don’t expose bare board.
How much bleed does packaging need? The standard is 1/8 inch (3mm) on each edge. Complex die-cut shapes sometimes need more. Confirm the exact amount with your supplier for your box.
What happens if I skip bleed entirely? A cutting shift can expose a thin strip of bare board. It can also leave a visible gap at a fold line. Our guide to what a dieline actually is shows how bleed fits into the full cut-and-fold layout.
Does bleed apply to color modes like CMYK too? Bleed and color mode are separate settings. Both matter for the same print file, though. Our guide to CMYK, RGB, and Pantone covers getting your color setup right alongside your bleed margin.
Get a free quote — dieline and design support included. Our team checks your artwork for bleed before print.