
Every custom box starts with a dieline. Not with a design, not with a color palette, not with a brief — with a dieline. It’s the first technical document your manufacturer creates, and every single thing that comes after it is built on top of it: the structural samples, the tooling, the print plates, the finished boxes.
Get the dieline right and the rest of the process flows cleanly. Get it wrong — or hand it to a designer who doesn’t know how to use it — and you’ll spend weeks redoing work that should have been correct from the start.
Here’s what a custom box dieline actually is, what the different lines and layers mean, and the specific mistakes that turn a two-week project into a six-week headache.
What a Dieline Actually Is
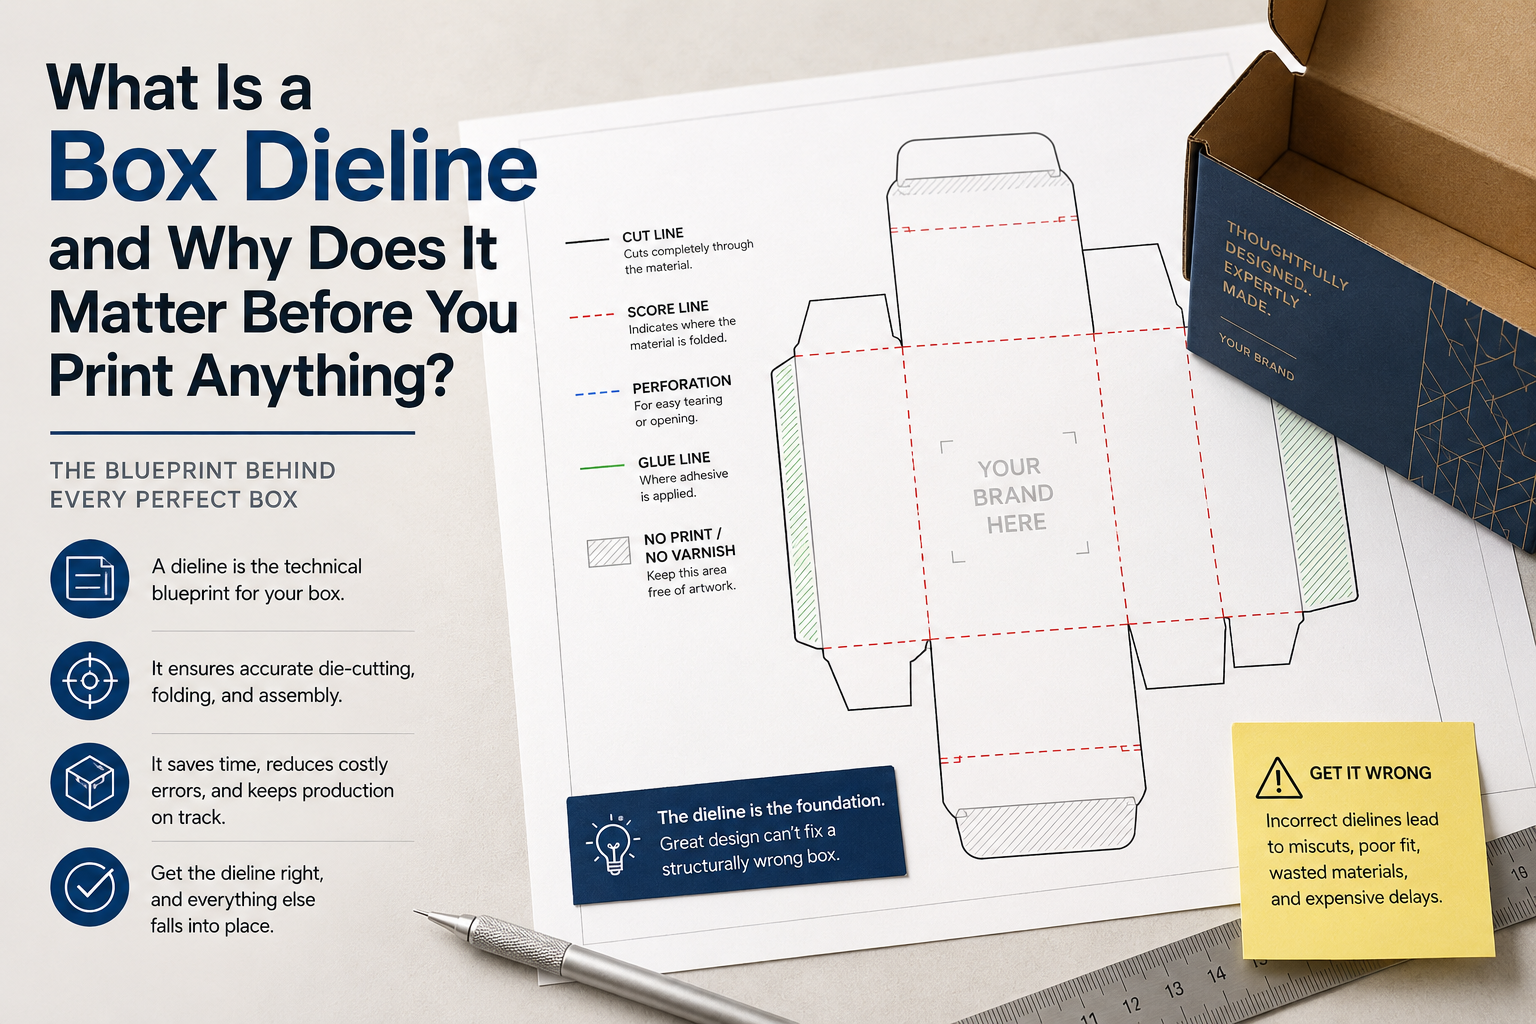
A dieline is a flat, two-dimensional technical drawing of your box, unfolded. Every fold, cut, score, and glue tab is shown as a line on that flat template. When the finished corrugated or paperboard sheet runs through the die-cutting machine in production, the machine follows the dieline exactly — cutting and scoring the sheet so it can be folded into your finished box.
Think of it this way: the dieline is the pattern. The die-cutting machine is the scissors. The corrugated sheet is the fabric. If the pattern is wrong, nothing cut from it will be right.
What the dieline is not: a design canvas. I’ve watched brand designers open a dieline in Illustrator and immediately start placing brand elements, drawing bleed fills, adjusting panel sizes — treating it the same way they’d treat a flyer template. That’s the mistake. The structural lines on a dieline are not suggestions. They represent precise mechanical tolerances. Move them and you’ve just specified a different box, whether you meant to or not.
The Lines on a Dieline and What They Mean
Standard dieline files use Pantone spot colors to separate functional layers. Different suppliers use slightly different conventions, but these are the most common:
Cut line (typically magenta or red): The outer edge of the box panel. The die blade cuts through the material along this line. This is the perimeter of the finished, flat box sheet before it’s folded. Do not move these lines without discussing the change with your manufacturer first — they define the structural dimensions of your box.
Score/crease line (typically blue): Where the material is creased (compressed) to create a clean fold. The score line doesn’t cut through the material — it just weakens it along a precise line so the fold happens exactly there, not a millimeter off. If your box has a panel that folds inward and the score line is slightly off, the assembled box won’t square up correctly.
Bleed line (typically green or yellow): The bleed is the zone outside your artwork that gets trimmed away. Standard packaging bleed is 3mm beyond the cut line. Any background fills or colors that run to the edge of a panel need to extend out to the bleed line — otherwise you’ll see a thin white or unprinted strip along the cut edge on the finished box. Every panel that has a printed background needs artwork extended to the bleed line, not just to the cut line.
Safe zone (not always shown as a separate layer): The area 3–5mm inside the cut line where important content — logos, text, key brand elements — should stay. The cut tolerance in die-cutting is typically ±1–2mm. If a logo sits right at the cut line edge, it may get partially trimmed on some units. Stay inside the safe zone and it won’t.
Glue tab (area marked on the dieline): The flap that receives adhesive in production to bond the box together. This is the single most commonly misunderstood area on a dieline. Artwork must not extend into the glue tab — if ink is present where the adhesive goes, the bond either fails or bonds weakly. Most suppliers mark this zone clearly. Respect it.
Perforation line (typically dashed): Used on boxes with tear-open features or partial perforations. Less common on standard mailer boxes, but critical to understand on retail-ready or promotional packaging.
How to Set Up a Dieline File Correctly
Your supplier will send you a dieline file — usually an .AI (Adobe Illustrator) or .EPS file, sometimes a layered .PDF. Before your designer touches it, there are four things to verify:
1. Confirm it’s the current version. Dielines get revised after sampling. If your structural dieline was updated after a white dummy sample — maybe a panel length changed, a flap depth was adjusted — but your designer is working from the previous version, the artwork won’t align with the tooling. Ask your supplier to confirm the version number before you start artwork.
2. Keep the structural layers locked. In Illustrator, the cut, score, and bleed lines should be on their own locked layer(s). Your artwork goes on a separate layer above or below. Never work on the same layer as the structural lines. Never move them.
3. Work in CMYK. Your artwork layer should be in CMYK color mode, not RGB. RGB colors convert unpredictably to CMYK in pre-press and will produce different colors on the finished box than you see on screen. If you have specific Pantone color requirements, specify them as Pantone swatches — don’t rely on RGB approximations.
4. Set resolution correctly. Minimum 300dpi at 100% scale for print. Placed images, photos, or texture fills should all be at full resolution. Downsampled or screen-resolution images will look soft or pixelated on the printed box.
These are the same issues that cause packaging mistakes at the artwork stage — the ones that come back as pre-press rejections and add days to the project timeline.
Board Thickness and Why It Matters for Dieline Dimensions
This is the technical detail that trips up the most experienced designers and even some less experienced packaging suppliers. When a flat corrugated sheet folds into a box, the material wraps around each score line. The thickness of the material means the inside of a fold has a slightly shorter path than the outside. At thin substrates — like 350gsm SBS paperboard — this is negligible. At B-flute corrugated (approximately 3–4mm thick), the cumulative effect on an assembled box’s interior dimensions is real.
What this means practically: the dieline dimensions represent the flat, unassembled sheet. Your product dimensions are interior dimensions of the assembled, folded box. If you simply spec “make the interior 200mm x 150mm x 80mm,” your supplier needs to account for material thickness in the dieline to deliver those assembled interior dimensions. If they don’t — or if you’re building a dieline yourself without accounting for it — your product will fit differently in the assembled box than the flat dieline suggests.
For most standard box orders, your supplier handles this automatically. But if you’re requesting a custom structural modification — changing a panel depth, adjusting a closure flap — understanding this principle helps you catch spec errors before they show up in a sample.
The Three Dieline Mistakes Brands Make Most Often
Designing on an exported image instead of the vector file. Some brands export the dieline as a JPEG or PNG to “show the designer what it looks like” and then the designer accidentally builds the artwork on that flat image instead of the actual vector .AI file. The result is an artwork file that can’t be used for production — it has no separate dieline layer, the resolution is wrong, and there’s no way to verify bleed margins. Always work on the vector source file.
Extending artwork into the glue tab. Background fills and colors that extend across the back panel of a custom mailer box frequently run into the glue tab without the designer realizing it. The glue tab is usually a small flap on the side panel, and it’s easy to miss when designing on a zoomed-out view of the full dieline. Zoom in. Check the tab. Make sure the background stops at the cut line of the tab, not beyond it.
Getting the bleed wrong on interior panels. Brands often apply bleed correctly to the exterior faces of a box but forget that interior panels — the inside of a lid, the bottom of a mailer — also need bleed if they have a printed background. If the interior has a colored tissue or printed insert graphic, the inside of the box body is also a printable surface and also needs proper bleed setup.
Getting Dieline Templates From Your Supplier vs. Building Your Own
For standard box styles — regular slotted containers, tuck-top boxes, standard mailer boxes — many suppliers provide dieline templates for common sizes. These are a legitimate starting point, but understand what you’re getting: a template built for a standard structural spec, not necessarily tuned for your specific product, material, or finish requirements.
For anything custom — a different flap depth, a magnetic closure, a unique structural feature, a custom size that doesn’t match standard templates — you need a dieline drawn specifically for your project by a structural packaging engineer. This is part of what your supplier does during the brief-to-dieline phase at the start of a new project.
The practical question for brands ordering standard corrugated mailer boxes: use the template as a dimensional guide, confirm the material spec matches what you’re ordering, and have your supplier verify the template before you build artwork on it. A five-minute confirmation email is faster than a one-week resample.
Knowing how packaging decisions affect the customer experience gives you the context for why getting these technical specs right actually matters for the finished product — it’s not just manufacturing bureaucracy.
What Happens When You Submit Artwork to Pre-Press
Once your artwork file is built on the correct dieline, it goes to your supplier’s pre-press team for review before printing. I’ve seen files come back for three or four rounds of correction on issues that could have been caught in five minutes before submission — missing bleed, wrong color mode, unlocked structural layers that got accidentally moved. Pre-press checks for:
Color mode (CMYK required, RGB flagged). Resolution (300dpi minimum at 100% scale). Bleed (is there 3mm bleed on all edges that require it?). Font embedding (all fonts must be embedded or outlined — if a font is missing from the file, the text will substitute, usually badly). Overprint settings (elements set to “overprint” in Illustrator may knock out or behave unexpectedly in print). Dieline registration (is the artwork layer correctly positioned relative to the structural lines?).
If any of these fail, the file comes back for correction. Each correction round adds 1–3 days. Understanding which printing method your job is running on — digital vs. offset — also affects how you set up your file, since plate-based offset has stricter pre-press tolerances than digital. Submitting a correct file in round one is the single best way to compress artwork approval time.
FAQ: Custom Box Dieline Templates
What software do I need to work with a dieline?
Adobe Illustrator is the industry standard for packaging artwork. Dielines are vector files (.AI or .EPS) and must be opened and edited in vector software. Photoshop can be used for rasterized texture elements but is not suitable for the dieline layer itself. If your designer doesn’t have Illustrator, some suppliers offer browser-based design tools that embed the dieline — ask your supplier if this is available.
Can I change the dieline dimensions myself?
You can modify a template for minor size adjustments, but structural changes — new closures, different flap configurations, changes to box style — should go through your supplier’s structural team. Die-cutting tooling is precision-machined to match the dieline. If you modify the dieline and submit artwork without telling your supplier, the tooling won’t match your file.
How do I know which side of the dieline is the exterior vs. interior?
Standard convention is that you’re looking at the exterior face when viewing the flat dieline. Most suppliers indicate this with a label or note on the file. Interior panels are visible from the other side of the flat sheet. If you’re printing on the interior of a box lid or body, ask your supplier to provide a separate interior dieline or mark clearly which faces are interior on the main file.
What’s the difference between a cut line and a bleed line?
The cut line is where the die blade cuts the material — the actual edge of your finished box panel. The bleed line is 3mm outside the cut line and marks how far your background artwork should extend beyond the cut edge. The extra 3mm gets trimmed away in production, ensuring no white edge appears along the cut line even if the cut is 1–2mm off-position.
Do I need a new dieline if I change box sizes?
Yes. A dieline is specific to a structural spec: material type, dimensions, flap configuration, and closure style. Changing the box size requires a new dieline and new tooling. Reusing an old artwork file on a new dieline requires repositioning and resizing all artwork elements to fit the new template — it’s not a simple resize.
What’s a safe zone and why does it matter?
The safe zone is 3–5mm inside the cut line. Because die-cutting has a tolerance of ±1–2mm, any content placed closer than 3mm to the cut edge risks being trimmed on some units. Logos, legal copy, product information, and any text that must be fully legible should stay inside the safe zone. Background fills and decorative elements can extend to the bleed line.
Can I get a dieline template before finalizing my box spec?
Most suppliers will provide a template dieline once you confirm the basic spec: box style, approximate dimensions, and material. This lets your designer start exploring layout concepts before the structural review is complete. Just confirm the final spec before building finished artwork — a template dieline built on preliminary dimensions will need to be updated if the spec changes after sampling.
The Dieline Is the Foundation
Everything about a custom box — the structural integrity, the print quality, the unboxing experience, the timeline — depends on the dieline being correct and being used correctly. It’s not glamorous. Nobody puts “mastered the glue tab area” on their portfolio. But brands that understand what the dieline is and how to work with it finish packaging projects in six weeks instead of fourteen.
The dieline isn’t the last step before design. It’s the first step in a technical process that the design has to respect. Get that sequence right and the rest of the project follows the logic of it. Get it backwards and you’re redesigning artwork for problems that were already solved in the structural spec.
Easy Box Packaging provides dieline files with every new custom box project, along with pre-press spec sheets that tell your designer exactly how to set up the artwork file. See our ecommerce packaging options to start a conversation about your box project — and we’ll walk you through the dieline process from the first brief.